

본 블로그에서 [작업일지]로 올라오는 코드는 한 차례 이상 재편집 되었습니다.
실 작업에 사용되는 코드가 아니며, 로직 등 참고로만 봐주세요.
의뢰 내용
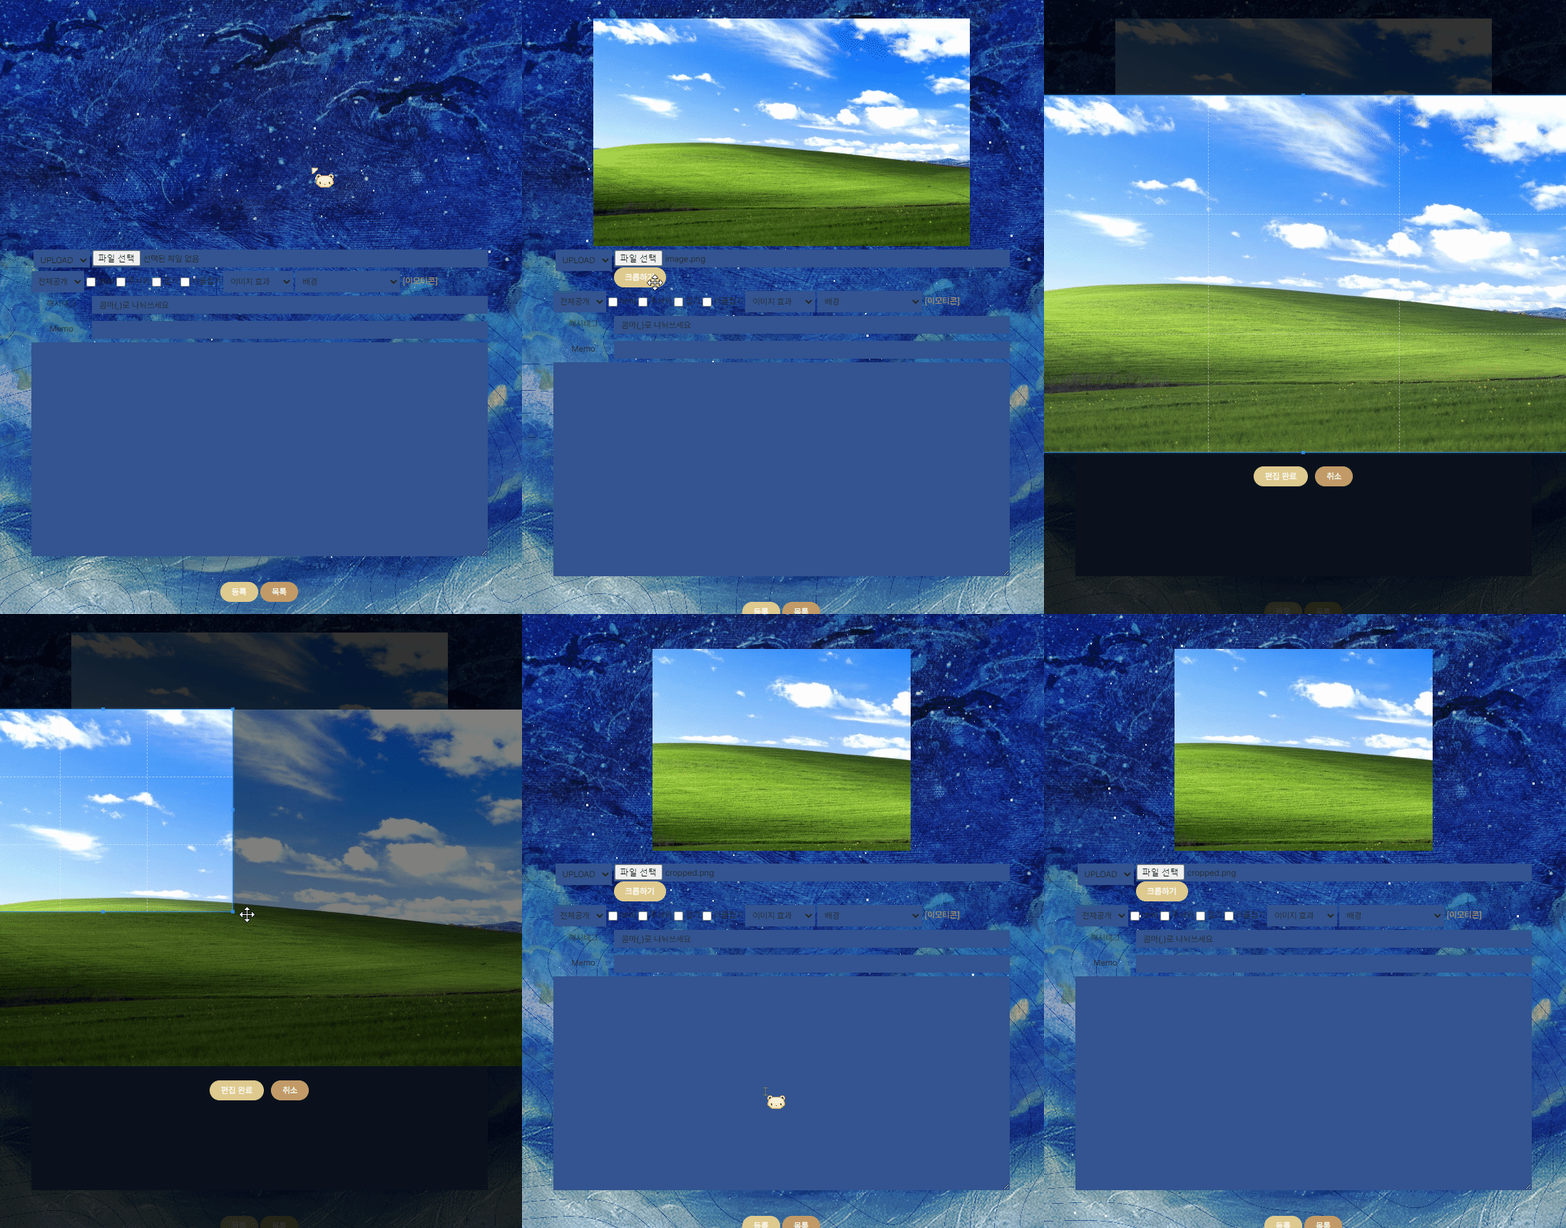
클립보드에서 붙여넣은 이미지 및 파일에 업로드한 이미지를 크롭해서 사용하고 싶어요.
딱히 회전기능이나 이미지 리사이즈 기능을 요청하지는 않으셨고, 그냥 크롭하여 이를 서버에 업로드할 수 있도록 원하셨다. 세팅 환경은 그누보드5고, 중요한 건 모든 게시판에 적용이었다.
크로퍼 사용
크로핑 기능은 자체 개발하려면 시간이 많이 걸리기도 하고, 가격도 많이 들기 때문에 오픈소스를 사용하기로 했다. 사용하기로 한 것은 cropper.js다.
https://fengyuanchen.github.io/cropperjs/
Home | Cropper.js
Import on-demandUse the parts you need and let the rest go with the wind.
fengyuanchen.github.io
이미 사용 메뉴얼도 유명하고, 두 차례 사용해본 적이 있어 익숙하여 채택하였다.
기본적인 함수
먼저 cropper를 선언해야한다.
var cropper; // 크로퍼 선언
그리고 크로퍼 안에서 사용되는 기본은 다음과 같다.
const img = document.createElement('img');
  const fileReader = new FileReader();
  fileReader.onload = function(e) {
    img.src = e.target.result;
    img.onload = function() {
      if (cropper) cropper.destroy();
      cropper = new Cropper(img, {
        dragMode: 'move',
        viewMode: 1,
        autoCropArea: 1,
        responsive: true,
        zoomable: true,
        scalable: true,
        cropBoxResizable: true,
        cropBoxMovable: true,
      });
    };
  };
  fileReader.readAsDataURL(file);
- fileReader를 생성하여 fileReader에 저장한다.
- fileReader .readAsDataURL(file)을 통해 파일을 base64 문자열로 넣는다.
- 그리고 이렇게 fileReader가 로드가 되면 function으로 로드 결과(즉 base64 데이터 URL 문자열)를 img.src에 넣는다
- 이렇게 이미지가 로드되면 크로퍼를 새로 생성한다(만약 기존 cropper가 생성되었다면 지운다). new cropper(이미지, {옵션})
- 크로퍼의 옵션에 맞춰(자세한 건 크로퍼 메뉴얼 참조) 설정한다.
모달 창 만들기
보통 이 경우 크로퍼를 담을 만한 창이 있으면 좋지만, 홈페이지 전체(즉 게시판 전체)를 사용하다 보니 임의로 모달을 만드는 쪽이 훨씬 더 낫기 때문에 모달을 만들기로 한다.
그리고 추가로 두 가지 경우(붙여넣기 동작 / 업로드 동작)가 있으므로 재사용이 가능하도록 인자를 받는 함수로 편집하였다.
function openCropperModal(file) {
  //편집용 Modal 생성
  const beforeModal = document.getElementById('cropperModal');
  if (beforeModal) beforeModal.remove(); //이미 있다면 제거

  const cropperModal = document.createElement('div');
  cropperModal.id = 'cropperModal';

  const imgContainer = document.createElement('div');

  const img = document.createElement('img');
  imgContainer.appendChild(img);

  const btnContainer = document.createElement('div');

  const completeBtn = document.createElement('button');
  completeBtn.textContent = '크롭 완료';
  completeBtn.onclick = function() {
    completeCrop();
  };

  const cancelBtn = document.createElement('button');
  cancelBtn.textContent = '취소';
  cancelBtn.onclick = function() {
    if (cropper) cropper.destroy();
    cropperModal.remove();
  };

  btnContainer.appendChild(completeBtn);
  btnContainer.appendChild(cancelBtn);

  cropperModal.appendChild(imgContainer);
  cropperModal.appendChild(btnContainer);
  document.body.appendChild(cropperModal);

  const reader = new FileReader();
  reader.onload = function(e) {
    img.src = e.target.result;
    img.onload = function() {
      if (cropper) cropper.destroy();
      cropper = new Cropper(img, {
        dragMode: 'move',
        viewMode: 1,
        autoCropArea: 1,
        responsive: true,
        zoomable: true,
        scalable: true,
        cropBoxResizable: true,
        cropBoxMovable: true,
      });
    };
  };
  reader.readAsDataURL(file);
}
- 모달(cropperModal)을 생성
- 이미지가 들어갈 imgContainer를 생성.
- imgContainer 안에 img를 넣는다.
- 버튼이 들어갈 btnContainer를 생성.
- 크롭 완료 및 취소 버튼을 btnContainer 안에 만든다.
- 각 버튼에 클릭 펑션을 추가한다.(완료의 경우 completeCrop을 추가)
크롭 완료
그리고 CompleteCrop을 사용한다.
서버에 저장할 경우 cropper.getCroppedCanvas(); 메서드와 blob을 사용하여야 한다. 여기서 저장 옵션에 대한 지정은 하지 않았다(요청 사항이 없었기 때문에).
Blob이란 Binary Large Object의 준말로, 파일류의 불변하는 미가공 데이터를 나타낸다(MDN 출처) 텍스트와 이진 데이터의 형태로 읽을 수 있다. 이 blob은 URL.createObjectURL이나 FileReader.readAsDataURL과 같은 메서드로 구체적으로 가시화될 수 있다.
function completeCrop() {
  if (!cropper) {
    alert('크롭 중인 이미지가 없습니다.');
    return;
  }
    cropper.getCroppedCanvas().toBlob((blob) => {
      const croppedFile = new File([blob], 'cropped.png', { type: 'image/png' });
      const dataTransfer = new DataTransfer();
      dataTransfer.items.add(croppedFile);
      const fileInput = document.querySelector("input[type=file]");
      fileInput.files = dataTransfer.files;

      cropper.destroy();
      document.getElementById('cropperModal').remove();
    });
}
여기서 좀 복잡해진다.
croppedFile은 new File(새 파일)로, 데이터는 [blob], 이름은 cropped.png, 타입은 image/png로 지정되었다.
그런데, 여기서 의뢰조건 중 하나가 바로 업로드 시 크롭이 아니라는 점. 즉, 크롭핑된 파일이 input file에 올라가야한다는 지점이다. 그런데 이 input file은 사실상 readonly다(value 조작 등을 해보면 바로 알 수 있다.) 그러하여 사용하는 것이 바로 DataTransfer다. DataTransfer로 파일 목록(FileList) 을 만들어서 대입해야만 fileInput에 추가가 가능한 것이다.
생성된 DataTransfer 객체는 .items를 가진다. 이것이 하나의 파일리스트라고 보면 된다.
items에 croppedFile을 add하고, 그 결과가 반영된 dataTransfer.files를 fileInput에 넣는다.
이후 cropper를 파괴하고, modal을 지운다.
클립보드 붙여넣기 동작과 업로드 동작에 반영하기
이렇게 크로퍼를 만들었다 치자. 하지만, 해당 동작에 바로 사용할 수 있는 게 아니다. 요청하신 것은 해당 동작들을 하면 버튼이 생성되고, 그 버튼으로 크롭핑이 가능하게 했으면 좋겠다였다.
그러므로 해당 동작들에 반응하여 크롭동작이 작동되는 버튼을 만들어야한다.
const beforeCropBtn = document.getElementById('cropBtn'); //크롭버튼 여부
if (beforeCropBtn) beforeCropBtn.remove(); //이미 버튼이 있다면 제거.
const cropBtn = document.createElement('button');
cropBtn.setAttribute('type', 'button');
cropBtn.setAttribute('id', 'cropBtn');
cropBtn.textContent = '크롭하기';

cropBtn.onclick = () => openCropperModal(file);

fileInput.insertAdjacentElement('afterend', cropBtn);
fileInput 뒤에 cropBtn을 만든다.
해당 cropBtn은 button이고, id는 cropBtn으로, 그리고 onclick 펑션으로 openCropperModal을 사용하기로 했다. 안에는 file을 넣는다.
그리고 각 동작과 그에 따른 조건을 붙여넣어야 한다. 체크해야할 것은 등록된 파일이 이미지형태냐는 것이다. 이미지가 아닌데 크롭이 뜨면 곤란하다.
클립보드의 경우 이미 file부분이 있기 때문에, 안에 넣으며 다음의 if 처리를 동반했다.(클립보드 동작 관련해서는 다른 사람의 코드이므로 적지 않는다).
if (file && file[0].type.startsWith('image/')) {
 //… 위 함수
}
업로드의 경우는 모든 input File이 change되는 걸 확인해야 하기 때문에 onChange를 사용하기로 했다. 라이브러리 언어가 더 다루기 쉽지만 클립보드 붙여넣기가 Vanilla JS여서 그에 맞춰 addEventListener로 적었다.
document.addEventListener('change', function(e) {
    if (e.target.type === 'file') {
        const file = e.target.files[0];
	if (file && file.type.startsWith('image/')) {
      //… 위 함수
	}
  }
});
미리보기 추가하기
이제 거의 다 되었다.
해당 게시판들에는 이미지를 미리보기가 가능한 경우가 있어서, 이에 관련한 로직을 추가하기로 했다.
function completeCrop() {
  if (!cropper) {
    alert('크롭 중인 이미지가 없습니다.');
    return;
  }
    cropper.getCroppedCanvas().toBlob((blob) => {
      const croppedFile = new File([blob], 'cropped.png', { type: 'image/png' });
      const dataTransfer = new DataTransfer();
      dataTransfer.items.add(croppedFile);
      const fileInput = document.querySelector("input[type=file]");
      fileInput.files = dataTransfer.files;

      const previewImg = document.getElementById('prev_view_image');
	  if(previewImg)
		previewImg.src = URL.createObjectURL(blob);

      cropper.destroy();
      document.getElementById('cropperModal').remove();
    });
}
previewImg가 있는지 확인하고, 있을 경우 src를 설정하기로 했다.
URL.createObjectURL은 주어진 객체를 가리키는 URL을 DOMString으로 반환해준다. 임시적인 것이므로 끄면 사라진다.
이로서 작업물이 완성되었다.
'개발일지 > 작업일지' 카테고리의 다른 글
| [개인 작업] HTTP 통신을 이용하여 사이트 간 RSS 피드 구성하기 (0) | 2026.01.16 |
|---|---|
| [개인 의뢰] form을 이용하여 페이지 이동 (0) | 2026.01.08 |
| [개인 의뢰] PHP에서의 json 데이터 활용 (0) | 2026.01.02 |


